Overview
In this article, we will take a look at how hooks, particularly handle & getSession work in SvelteKit. Then I will show a usecase of hooks in a simple app. A user will be able to login and we will authenticate the user and set a cookie. Then whenever the user visits a page, we will check if the cookie is in the request to determine whether or not he/she is authorized to visit the page.
What is Hooks?
In programming, a hook is a place and usually an interface provided in packaged code that allows a programmer to insert customized programming. If you are familiar with a middlware in a server-side programming of node.js and express.js, that is considered as a hook because it does certain things inside the middleware by accessing to a request and a response object.
In SvelteKit, there are currently four functions provided as part of hooks at the time of this writing:
handlehandleErrorgetSessionexternalFetch
To be able to do cookie-session authentication, we need only two of them: handle & getSession.
Let's dive into each of them and check out how they work.
Getting started
Create a skeleton Sveltekit project and spin up a dev server.
Terminalnpm init svelte@next cookie-session-authcd cookie-session-authvim . # Or code . if you use a VS Code editornpm installnpm run dev
Open up a browser and access http://locahost:3000. You should be able to see a welcome page.

getSession
In this section, we will take a look at how to create a session data on a server using getSession and access it from a client side using two methods:
getSession() runs whenever SvelteKit server-renders a page. It takes an event object and returns a session object that is available on the client side. Note that the session object must be serializable, which means that it must not contain things like functions or classes.
To use getSession, we must create a hooks.js file in our ./src directory:
./src/hooks.js1export const getSession = event => {2 console.log(event)34 return {5 user: {6 id: '1h4jk90ds',7 name: 'John Doe',8 role: 'admin',9 },10 }11}
Go back to your terminal and check out the event object printed out:
console.log(event)1{2 clientAddress: [Getter],3 locals: {},4 params: {},5 platform: undefined,6 request: Request {7 size: 0,8 follow: 20,9 compress: true,10 counter: 0,11 agent: undefined,12 highWaterMark: 16384,13 insecureHTTPParser: false,14 [Symbol(Body internals)]: {15 body: null,16 stream: null,17 boundary: null,18 disturbed: false,19 error: null20 },21 [Symbol(Request internals)]: {22 method: 'GET',23 redirect: 'follow',24 headers: [Object],25 parsedURL: [URL],26 signal: null,27 referrer: undefined,28 referrerPolicy: ''29 }30 },31 routeId: '',32 url: URL {33 href: 'http://localhost:3000/',34 origin: 'http://localhost:3000',35 protocol: 'http:',36 username: '',37 password: '',38 host: 'localhost:3000',39 hostname: 'localhost',40 port: '3000',41 pathname: '/',42 search: '',43 searchParams: URLSearchParams {},44 hash: ''45 }46}
As you see, we have lots of information available in the event object. Please pay attention to the highlighted line locals:{},. In the example, we will populate this locals object through handle function that will run on the server every time it receives a request. What this means is that intead of populating the user data inside getSession as we did above, we will intercept the request first and populate the user session data via locals object using handle.
Because the getSession returns a session object to a client, whatever we pass in the session object will be accessible through two ways in the client side:
1. Using $app/stores
$app/stores is one of built-in modules in SvelteKit. To access the session data we populated on the server, we can import session from $app/stores on the client. The session object has two important characteristics:
- Contextual
- What this means is that it is added to the context of the root component of our app.
- Unique
- It is also unique to each request on the server. What this means that the
sessionis not shared between multiple requests handled by the same server simultaneously.
These two properties make the session so useful to store user-specific data. To use stores, it is important to note that we must subscribe to it while component is being initialized. Using $session would do subscription for us convienently.
./src/routes/index.svelte1<script>2 import { session } from "$app/stores";3</script>45<h1>Session Object</h1>6{JSON.stringify($session)}
Make sure to spin up dev server and access http://localhost:3000 in a browser:

2. Using load function
You can also use load to access the session object as well by modifying the index.svelte. To understand how load function works in SvelteKit, you can read this article.
./src/routes/index.svelte1<script context="module">2 export const load = ({ session }) => {3 return {4 props: {5 session,6 },7 };8 };9</script>1011<script>12 export let session;13</script>1415<h1>Session Object</h1>16{JSON.stringify(session)}
Make sure to spin up dev server and access http://localhost:3000 in a browser:

handle
handle() runs on the server every time SvelteKit receives a request. It receives two objects as the function arguments:
- an
eventobject that carries the request and - a
resolvefunction that invokes SvelteKit's router and generates a response
Through the handle, we can modify both the request and a response.
Update the hooks.js file in the project root directory with the following changes:
./src/hooks.js1export const handle = async ({ event, resolve }) => {2 console.log(event)34 event.locals.userName = 'Mary Doe'56 const response = await resolve(event)78 response.headers.set('x-custom-header', 'custom-header')910 return response11}1213export const getSession = event => {14 console.log(event)1516 return {17 user: {18 id: '1h4jk90ds',19 name: 'John Doe',20 role: 'admin',21 },22 }23}
What this code does
We've added another function handle that receives event and resolve. The console.log(event)(line 2) will spit out the same object in the terminal as we've seen from getSession example with locals: {}, in it. However, we populate locals with userName: 'Mary Doe' right before resolving the request in handle function so that getSession will receive event object with the populated locals in it.
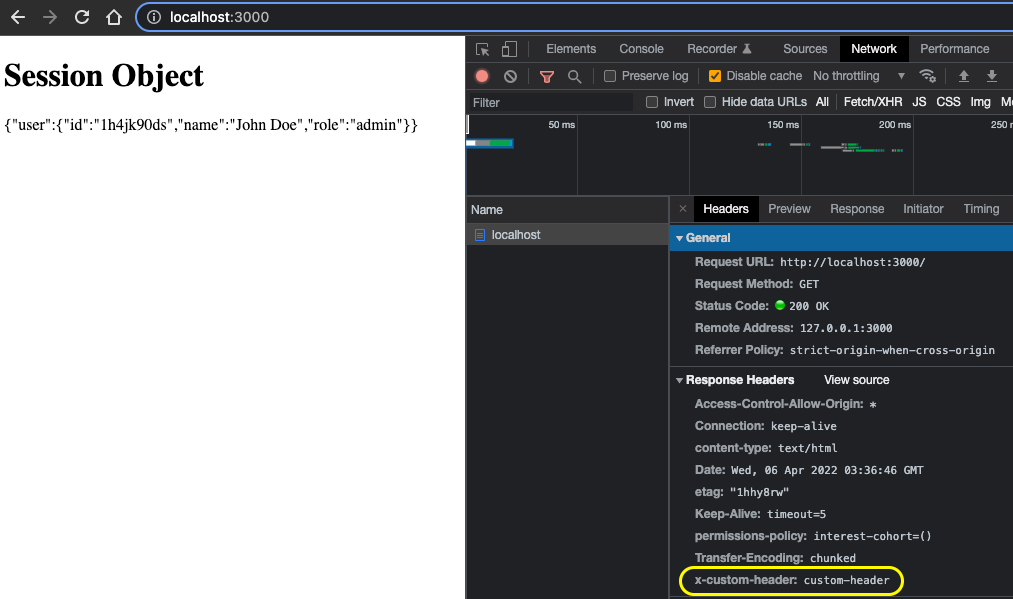
Then we immediately resolve the event to receive a response(line 6). We attach a custom header to the original response(line 8) that is going to sent to the client. If you open up your browser's developer tool and inspect the repsonse headers after accessing http://localhost:3000, there will be x-custom-header: custom-header:

The getSession function is exactly the same as before. But check your terminal again, you will see that this time the console.log(event)(line 12) printed out locals: { userName: 'Mary Doe' }, in the terminal because the handle had intercepted the request and added the userName.
Example: Cookie Session Authentication
Now that we know how getSession, handle work in SvelteKit, we can take a step further to do a cookie session authentication in a simple app. The app itself won't be a complete form, but it would suffice to show how things are put together to make authentication work in SvelteKit.
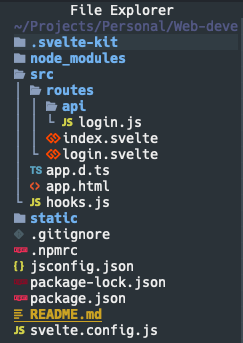
Let's work on making authentication endpoints first.
App Structure

Install Dependencies
Terminalnpm install cookie uuid
Login Page
Let's get started with creating a new page login.svelte in ./src/routes directory:
./src/routes/login.svelte1<script>2 let msg = "";34 const login = async () => {5 const res = await fetch("/api/login", {6 method: "POST",7 // For demonstration purpose, we just hard-coded a user email and password8 body: JSON.stringify({9 email: "johndoe@example.com",10 password: "secret",11 }),12 headers: {13 "Content-Type": "application/json",14 },15 });1617 const data = await res.json();1819 if (!res.ok) {20 msg = data.msg;21 return;22 }2324 msg = data.msg;25 };26</script>2728<h1>Login</h1>29<button on:click={login}>Login</button>30<p>{msg}</p>
Basically, what this code does is that once a user clicks the login button, it will make a HTTP POST request to the /api/login endpoint. Depending on the server response, it will display the corresponding(i.e., login success or fail) message on the login page.
Login Endpoint
To handle the HTTP POST request from the login page, we have to create a matching endpoint:
./src/routes/api/login.js1import { serialize } from 'cookie'2import { v4 as uuidv4 } from 'uuid'34export const post = async ({ request }) => {5 const user = await request.json()6 console.log(user)78 // In a real life situation, the password must to be hashed/salted and compared to database9 if (!(user.email === 'johndoe@example.com' && user.password === 'secret')) {10 return {11 status: 401,12 body: {13 msg: 'Invalid email or password',14 },15 }16 }1718 const sessionId = uuidv4()19 console.log(sessionId)2021 const headers = {22 'Set-Cookie': serialize('session_id', sessionId, {23 httpOnly: true,24 sameSite: 'lax',25 maxAge: 60 * 60 * 24 * 7, // 7 days26 secure: process.env.NODE_ENV === 'production',27 path: '/',28 }),29 }30 console.log(headers)3132 return {33 status: 200,34 headers,35 body: {36 msg: 'Login successful!',37 },38 }39}
Let's break down what this code does:
The
/api/login.jsendpoint will receive a HTTP POST request from a client and check if a user email and a password are valid. The console-loggeduserin line 6 is:{ email: 'johndoe@example.com', password: 'secret' }If the email or the password are not valid, it returns a
status 401with a message,Invalid email or password.Otherwise, it creates a session id with the help of
uuidpackage and Thesession_Idwill be something like this:49914bf9-64e6-424a-bb2e-df7348882256Then it also generates a
Set-Cookieheaders with the session id usingcookiepackage. Theheadersis set like:{'Set-Cookie': 'session_id=49914bf9-64e6-424a-bb2e-df7348882256; Max-Age=604800; Path=/; HttpOnly; SameSite=Lax'}Set-Cookie Attribute Explanation httpOnlyBy setting it true, this prevents the client javascript from accessing the cookiesameSiteThis sets the Same-Siteattribute in the cookie. The cookies are sent when a user is navigating to the origin site only.maxAgeThis sets the Max-Ageattribute in the cookie. It lets the cookie be deleted in the browser when a specified period is over.secureBy setting it true, the cookie is sent to the server only when a request is made with thehttps:scheme.pathThis indicates the path that must exist in the requested URL for the browser to send the Cookieheader. We set it to/so that the cookie will be sent to each request.Once the header is created, we finally return an object with a
status 200, the headers, and a body messageLogin successful!.
Hooks: handle, getSession
./src/hooks.js1import { parse } from 'cookie'23export const handle = async ({ event, resolve }) => {4 // Print out cookie in the terminal5 // It will be something like: session_id=49914bf9-64e6-424a-bb2e-df73488822566 console.log(event.request.headers.get('cookie'))78 // Parse cookie9 const cookies = parse(event.request.headers.get('cookie') || '')10 console.log('cookies: ', cookies)1112 // Attach a user object with the cookies to the event.locals13 event.locals.user = cookies1415 // Determine whether or not a user is authenticated by checking out the sesssion_id16 if (!cookies.session_id) {17 event.locals.user.authenticated = false18 } else {19 event.locals.user.authenticated = true20 }2122 // Resolve the request23 const response = await resolve(event)2425 return response26}2728export const getSession = event => {29 console.log(event.locals.user)30 const user = event.locals.user3132 if (!user.session_id) {33 return {}34 }3536 return {37 user,38 }39}
handle
Let's break down what this code does:
handlewill take an event object as an argument and get a cookie object fromevent.request.headers.- Then it parses the cookie using
parse()from cookie package The parsed cookie will be like this:{ session_id: '49914bf9-64e6-424a-bb2e-df7348882256' } - Then we set
event.locals.userto the parse cookie. - If the cookie has a session id, we attche
authenticatedkey with a valuetrue, otherwise 'false' to theevent.locals.user. - Then we resolve the request and return a response.
getSession
Because the handle has intercepted the request and already determinied whether or not a user is authenticated, we can set a session object using getSession so that it can be available in the client.
getSessiontakes an event object that has passed throughhandle. When you console logevnet.locals.user, you will be able to see:{session_id: '49914bf9-64e6-424a-bb2e-df7348882256',authenticated: true}- If the user does not have a session id, then we return nothiing.
- Otherwise, we return the user object.
Back to Login Page
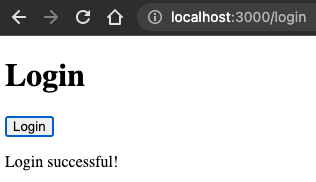
In your browser, please access http://locahost:3000/login. Once you click Login button in the login page, you will be able to see the Login successful message:

Because the login is successful, the /api/login endpoint returns the headers with Set-Cookie header as a part of response. When the client receives the status 200, the session_id will be available in your local browser. You can confirm this from your chrome developer tool:

The session_id will be effective for 7 days as we've set maxAge to 7 days, so every time you send another request to the server, the server will run hooks.js and receive a cookie headers as part of request and attempt to check if the user is authenticated or not through handle.
Main Page
Since we would like to confirm that the client gets the session data, let's use load function to access session and display it:
./src/routes/index.svelte1<script context="module">2 export const load = ({ session }) => {3 return {4 props: {5 session,6 },7 };8 };9</script>1011<script>12 export let session;13</script>1415<h1>Session Object</h1>16{JSON.stringify(session)}
Assuming that you've successfully logged in and hit the main page http://locahost:3000, you will be able to see the user's session data displayed like this:

Comments